

What Is A Histogram On A Camera
The Editor

The Image Editor tab in RawTherapee five.5.
Contents
- 1 Introduction
- 2 The Preview Panel
- ii.i Eek! My Raw Photo Looks Unlike than the Camera JPEG
- 2.2 Scrollable Toolbars
- 2.iii Preview Modes
- 2.3.one Red, Green, Bluish and Luminosity Preview Modes
- 2.iii.2 Focus Mask
- 2.4 Groundwork color of the preview
- 2.v Detail Window
- two.6 Preview refresh delay
- 3 The Left Panel
- 3.1 Primary Histogram
- 3.one.ane Raw Histograms
- iii.2 Navigator
- 3.3 History
- 3.iv Snapshots
- 3.1 Primary Histogram
- 4 The Right Panel
- 4.ane Processing Contour Selector
- four.2 Toolbox
- 5 Editor Tab Modes
- 6 The Filmstrip
- vii Monitor Profile and Soft-Proofing
1 Introduction
The Image Editor tab is where y'all tweak your photos. By default RawTherapee is in "Unmarried Editor Tab Way, Vertical Tabs" (SETM) which is more retentivity-efficient and lets you apply the Filmstrip (described below). Yous can switch to "Multiple Editor Tabs Fashion" (METM) by going to "Preferences > General > Layout", withal each Editor tab will require a specific amount of RAM relative to the paradigm size and the tools you use, and also the Filmstrip is hidden in this fashion, and so we recommend you first requite SETM a try.
2 The Preview Console
The primal console holds a preview of your photo. This preview is generated from the actual raw data by processing it according to the settings either you manually set, or those that are stored in the processing profile used when opening that photo, as specified in "Preferences > Image Processing > Default Processing Profile". The preview will evidence you the result of all the adjustments you make. Annotation that the effects of some tools are only accurately visible when you are zoomed in to one:1 (100%) or more. These tools are marked in the interface with a "1:i" icon ![]() next to the tool's proper noun.
next to the tool's proper noun.
The image y'all see in the preview is taken from the working contour'southward color space and converted into the monitor profile's color space, if a monitor profile is loaded, or into sRGB if ane is not. It does not take into account the "Output Profile" department of the "Colour Direction" tool.
2.one Eek! My Raw Photo Looks Dissimilar than the Photographic camera JPEG
After opening a raw photograph you will notice that it looks different, oftentimes worse - darker, less sharp, more than dull, lacking contrast, more noisy - than your camera's JPEG, or than the same raw photograph when viewed in other software. What gives? Witches, aliens, possums, or by pattern?
There are three things you must know first to understand what is happening here:
- Your camera does non show you the real raw data when you shoot raw photos. It processes the raw image in many ways before presenting you with the histogram and the preview on your camera's digital brandish. Even if you fix all the processing features your camera's firmware allows you to tweak to their neutral, "0" positions, what you meet is still non an unprocessed image. Exactly what gets applied depends on the choices your camera's engineers and management fabricated, but usually this includes a custom tone curve, saturation boost, sharpening and noise reduction. Some cameras, particularly depression-end ones and Micro Four-Thirds organization, may also apply lens distortion correction to not merely fix barrel and pincushion distortion but also to hibernate astringent vignetting problems. Nigh cameras as well underexpose every photo y'all take by anywhere from -0.3EV to even -1.3EV or more, in social club to gain headroom in the highlights. When your photographic camera (or other software) processes the raw file it increases exposure compensation past the same amount, making the brightness appear correct and hoping to recover some highlights in the process. RawTherapee shows y'all the real raw data which may mean your photos appear dark, then it is upward to you lot whether you utilize the required exposure increase and how y'all go virtually doing then, whether by using the Exposure Bounty slider or one of the various tone curves. Increasing exposure compensation makes noise more apparent regardless whether it is your camera or RawTherapee which does information technology, but other than this RawTherapee does not "add racket"! Many cameras apply noise reduction to the JPEGs (behind your back) to lower the noise level after increasing the exposure compensation, so you should expect at that place to exist a divergence between your out-of-photographic camera JPEG and RawTherapee's epitome if noise reduction in RawTherapee is not enabled.
- Every DSLR raw file contains a processed JPEG epitome. Most raw files contain a JPEG image of the same full resolution as your camera can shoot, and some raw files contain as many equally iii JPEG images differing only in resolution. When you open raw files in other software, what you are usually seeing is non the raw information, but the embedded, candy JPEG paradigm. Examples of software which are either incapable of or which in their default settings do not show yous the existent raw information: IrfanView, XnView, Gwenview, Geeqie, Center of GNOME, F-Spot, Shotwell, gThumb, etc. It is worth mentioning at this betoken that if you shoot in "RAW+JPEG" mode, you are in fact wasting disk space and gaining zip for it, as your raw files already contain the embedded JPEG files which yous tin view using the listed programs. The embedded JPEG may differ from an 'external' one as saved using "RAW+JPEG" fashion in compression.
- Almost raw evolution programs (programs which do read the real raw data instead of just reading the embedded JPEG) apply some processing to it, such as a base tone curve, fifty-fifty at their most neutral settings, thereby making it incommunicable for users to see the real, untouched contents of their raw photos. Adobe Lightroom is an example. Comparing RawTherapee's real neutral image to a quasi-neutral one from these other programs volition expose the differences.
RawTherapee, on the other paw, is designed to show you the real raw prototype in the main preview, leaving the manner you desire this data candy up to you. When you utilize the "Neutral" processing profile you will see the demosaiced image with camera white residuum in your working colour space with no other modifications. You tin even run into the non-demosaiced image by setting the demosaicing option to "None". To provide you with a more aesthetically pleasing starting bespeak, we practise ship a collection of processing profiles with RawTherapee. Later installing RawTherapee, the default profile for processing raw photos is eponymously called "Default". We also ship the "Default ISO Medium" and "Default ISO High" profiles which are designed to give a skillful starting point to moderately noisy and very noisy images, respectively.
None of the shipped profiles (at least none of the ones shipped in RawTherapee 5.0) are designed to imitate your camera'due south look. Why not? Every camera is different. My camera'south image quality at ISO1600 could exist far noisier than your camera'due south. My camera's response to colors differs from yours. Even the same photographic camera can behave differently at diverse settings. To provide such profiles, we would need access to raw files for every supported camera model, oft multiple raw files in various shooting modes for a single camera, and countless person-hours. This may be possible as a community effort, but it is not a job for a modest team. Even then, of what purpose would RawTherapee exist if you ended upwards with a camera JPEG await?
It is far more than reasonable that you lot acquire how to use the powerful tools that RawTherapee provides to go the most out of your raws, to surpass the camera wait.
As of September 2015 we are starting to send DCP input profiles fabricated using DCamProf which include an optional tone curve. This curve is modeled after Adobe Camera Raw's default film curve and renders a result similar to your "camera look". The reason we include the curve in new DCP profiles is because it makes for a practiced vibrant starting point (as opposed to the flat wait of using the "Neutral" processing profile) without having to use Automobile Levels and without having to touch whatsoever of the other tools, and it is entirely optional. Practice read the article on input profiles. If we transport a DCP for your camera model which includes the tone curve, the "Tone curve" checkbox in Colour Management > Input Profile > DCP will be clickable. Applying the (Neutral) processing profile volition disable the tone bend. While the input color profile is applied at the first stages of the toolchain pipeline, the DCP tone bend is applied later in the pipeline at some point afterwards the Exposure tool.
You lot tin create a processing contour ideally tailored to your camera and lens combination, and set RawTherapee to use it by default on your raw photos. See the Creating processing profiles for general use article to learn how.
2.2 Scrollable Toolbars
The toolbars above and below the primary preview agree a certain number of buttons and other widgets which might not fit on lower resolution screens. If your screen's resolution is too low to fit the whole toolbar, some of the toolbar's contents (buttons, drop-downs, etc.) may become hidden. To see them, only hover the cursor over the toolbar and use the mouse scroll-wheel to gyre the contents left and right.
2.3 Preview Modes
In add-on to the normal preview, RawTherapee supports a number of other preview modes to help y'all tweak your photos. Preview modes are controlled via buttons in the Editor toolbar or via keyboard shortcuts. Only one preview mode tin be engaged at a time.
The post-obit preview modes are currently supported:
- Red aqueduct,
- Green channel,
- Bluish channel,
- Luminosity, which is calculated every bit 0.299*R + 0.587*G + 0.114*B,
- Focus mask, to run into which areas are in focus
- Preview modes
-

Regular
-

Red
-

Green
-

Bluish
-

Luminosity
-

Focus Mask
2.3.1 Blood-red, Green, Blue and Luminosity Preview Modes
The clipped shadow ![]() and
and ![]() highlight indicators in the Editor permit you to hands see which areas of the paradigm are too nighttime or as well bright. Highlighted areas are shaded co-ordinate to the much they transgress the thresholds.
highlight indicators in the Editor permit you to hands see which areas of the paradigm are too nighttime or as well bright. Highlighted areas are shaded co-ordinate to the much they transgress the thresholds.
The thresholds for these indicators are defined in Preferences > Full general.
The clipped shadow indicator will highlight areas where all three channels fall at or below the specified shadow threshold.
The clipped highlight indicator will highlight areas where at to the lowest degree one channel lies at or above the specified highlight threshold. If you desire to see just where all channels are clipped, and so enable the luminosity preview mode in addition to the clipped highlight indicator.
Clipping is calculated using data which depends on the country of the gamut button ![]() which you can toggle higher up the principal preview in the Editor tab. When the gamut push is enabled the working contour is used, otherwise the gamma-corrected output profile is used.
which you can toggle higher up the principal preview in the Editor tab. When the gamut push is enabled the working contour is used, otherwise the gamma-corrected output profile is used.
Preview of individual channels may be helpful when editing RGB curves, planning black/white conversion using the channel mixer, evaluating image dissonance, etc. Luminosity preview is helpful to instantly view the epitome in blackness and white without altering development parameters, to run into which channel might be clipping or for aesthetic reasons.
2.3.2 Focus Mask
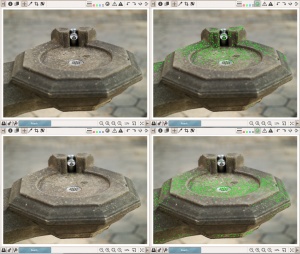
Focus mask indicating the focusing plane
The focus mask is designed to highlight areas of the image which are in focus. Naturally, focused areas are sharper, and then the sharp areas are beingness highlighted. The focus mask is more than accurate on images with a shallow depth of field, low dissonance and at higher zoom levels.To improve detection accuracy for noisy images evaluate at smaller zoom, effectually the 10-xxx% range. Note that the preview is rendered more slowly when the focus mask is enabled.
The current implementation analyzes the preview epitome which is rescaled from the original captured size. This procedure of rescaling reduces the noise and is helpful to identify truly sharper details rather than dissonance itself which may also contain micro texture. At the same fourth dimension, rescaling of the original image to the preview size compresses larger scale details into a smaller size, and it may introduce aliasing artifacts, both of which could lead to faux positives. You can increase your confidence past viewing the mask at various zoom levels. Information technology is not always fault proof, but tin be helpful in many cases.
Warning: Be sure to double-check your images if you lot decide to delete them based on the focus mask.
2.four Background color of the preview
The background color of the preview panel surrounding the epitome surface area may be changed to ease image preview during editing and to ameliorate visualize image cropping. A vertical stack of three thin buttons in the preview modes toolbar above the paradigm preview panel allows to set the background colour of the area around the photo preview.
two.v Detail Window
The "New detail window" button ![]() , situated beneath the main preview next to the zoom buttons, opens a new viewport over the chief preview of an adjustable size and of adjustable zoom. This lets you work on the photo zoomed-to-fit while examining several areas of interest at a 100% zoom (or even more). The benefit of using this feature is particularly of import to users with slower machines, though not but them, every bit the zoomed-out principal preview takes a shorter corporeality of time to update than if you were to zoom it to 100% because working at a zoom level less than 100% excludes certain tedious tools, such equally Noise Reduction, while the little detail windows zoomed to 100% practise include all tools and are fast to update because of their small size. This allows y'all can utilize the main preview for your full general exposure tweaks where it is necessary to see the whole image, and one or more detail windows to get sharpening and/or noise reduction simply correct.
, situated beneath the main preview next to the zoom buttons, opens a new viewport over the chief preview of an adjustable size and of adjustable zoom. This lets you work on the photo zoomed-to-fit while examining several areas of interest at a 100% zoom (or even more). The benefit of using this feature is particularly of import to users with slower machines, though not but them, every bit the zoomed-out principal preview takes a shorter corporeality of time to update than if you were to zoom it to 100% because working at a zoom level less than 100% excludes certain tedious tools, such equally Noise Reduction, while the little detail windows zoomed to 100% practise include all tools and are fast to update because of their small size. This allows y'all can utilize the main preview for your full general exposure tweaks where it is necessary to see the whole image, and one or more detail windows to get sharpening and/or noise reduction simply correct.
ii.half-dozen Preview refresh filibuster
Changing any tool's parameters sends a betoken for the preview prototype to be updated accordingly. Imagine what would happen if there was no "delay period", and you dragged, for instance, the exposure compensation slider from 0.00 to +0.sixty. A signal would be sent to update the preview for every single change of that value - for +0.01, +0.02, ... +0.59, +0.threescore. Updating the preview sixty times would be completely unnecessary and actually have longer than it takes yous to move the slider. This is especially true for more complicated tools, such equally dissonance reduction, where a preview update can take even a second (depending on your CPU and preview size). The solution is for RawTherapee to wait for a very short period from the moment you stop moving a slider (you don't take to let go of it, pausing motion is plenty) until the moment it sends a indicate for the preview to exist refreshed.
We have introduced 2 parameters which command the length of this waiting menses:
- AdjusterMinDelay
- Default value = 100ms.
- This is used for tools with a very fast response fourth dimension, for case the exposure compensation slider.
- AdjusterMaxDelay
- Default value = 200ms.
- This is used for tools with a wearisome response time, for case the CIECAM02 sliders.
You tin can adjust both of these values in the options file in the config binder.
three The Left Console
To the left is a panel which optionally shows the main histogram ("Preferences > General > Layout > Histogram in left panel"), and always shows the Navigator, History and Snapshots. You tin hide this panel using the ![]() hibernate icon, or its keyboard shortcut.
hibernate icon, or its keyboard shortcut.
3.1 Main Histogram
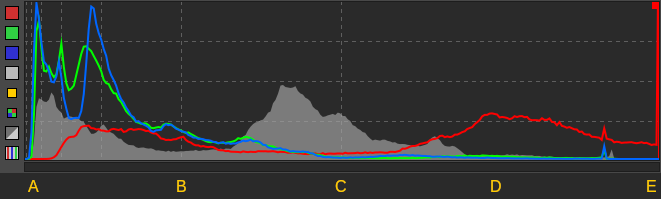
Histogram showing all three channels and luminosity.

The histogram in RawTherapee 5.7, showing a histogram of the raw data in all three modes - linear-linear, linear-log and log-log. We can see that the raw file is not clipped.
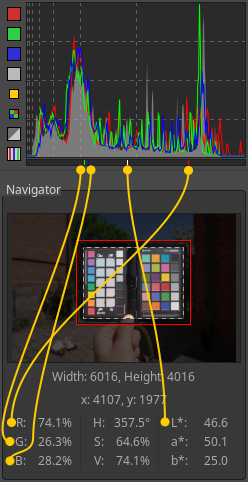
The RGB indicator shows the position in the histogram of the R, G, B and L values of the pixel your cursor is hovering over.
A histogram in photography is a graphical representation of the number of pixels of a given value. Typically the horizontal axis represents the range of possible values while the vertical centrality represents the count of pixels with that value. The axes need not be linear - RawTherapee can too calibration the histogram logarithmically.
Regardless of the photo's bit depth, the histogram itself has a precision of 256 sampling bins. To understand this, permit us look at the example of a sixteen-fleck epitome using integer precision. Its range of possible values spans from 0 to 65535 (2^16 = 65536 possible values, and since 0 is a possible minimum value and then the maximum value is 65535). Drawing a histogram using 16-bit precision would mean that it would need to be 65535 pixels wide to faithfully correspond the data, and no screen today is anywhere near that wide. Instead, all pixels with values from 0 to 255 (65535/256*1) are grouped into the first "bin". The second bin consists of a count of all pixels with values from 256 to 511 (65535/256*2). The third bin represents values 512 to 767 (65535/256*3). And so on until bin 256. This happens regardless of the input image's scrap depth - and RawTherapee's engine uses 32-bit floating-point precision anyway.
The main histogram can simultaneously evidence one or more of the following:
The histogram shows the channels listed above using the gamma-corrected output profile when the gamut button ![]() is disabled (default), or using the working profile when the push button is enabled. The status of this push also affects the values shown in the Navigator console, as well as the clipped shadow
is disabled (default), or using the working profile when the push button is enabled. The status of this push also affects the values shown in the Navigator console, as well as the clipped shadow ![]() and
and ![]() highlight indicators. It does not impact the raw histogram.
highlight indicators. It does not impact the raw histogram.
Like h2o in a pipeline, epitome data flows through RawTherapee from the input file through various stages, nearly of which the user tin command, to the output. The output could be the image saved in a file, or the image displayed on your screen. Each stage affects the color data. The histogram allows you to visualize this data at several stages. By default, the histogram shows color data as information technology will appear if you salvage the output paradigm, including processing washed at all intermediate stages. By enabling the gamut button ![]() yous can peak at the data at the early phase where it gets converted into the working infinite. You can even look at the raw information before whatever transformations or demosaicing are applied.
yous can peak at the data at the early phase where it gets converted into the working infinite. You can even look at the raw information before whatever transformations or demosaicing are applied.
Let'due south examine the large histogram case above. Though it actually shows four histograms (ruby-red, green, blue and luminance), focus on ane histogram at a time. The horizontal axis represents the possible values of the histogram, where "A" are the darkest values possible, "C" the mid-tones, and "Due east" the brightest possible values. The position of the histogram line on the vertical centrality represents how many pixels accept that value. Nosotros can see that there are zero pixels in the red aqueduct with values around "A" (from zero to very dark), because the histogram line lies right along the lesser. There is a pregnant number of pixels where the red channel is dark (betwixt A and B), and a meaning number where it is light (effectually D). Then, importantly, there is a spike at the right end of the histogram, at E - it tells usa that a large number of pixels have maximal scarlet values - they are clipped.
More often than not speaking, you lot should care when clipping occurs on skin, and not care when it's due to specular highlights. If a histogram shows clipping, and if y'all care almost the clipped regions, you should start past establishing where the clipping occurs. Check the raw histogram - are any channels clipped? If yes, and so maybe highlight reconstruction can help. If the raw histograms are not clipped, then all the required information is intact, and it is some stage downstream in the pipeline which causes clipping. Ensure your working profile'south gamut is large enough by enabling the gamut push ![]() to see histograms at the working profile stage of the pipeline. You lot might want to temporarily apply the Neutral profile to disable all the tools while checking, then revert. If your working space is not causing clipping (the default working infinite is ProPhoto and information technology's huge), then it's probable your adjustments which are causing clipping. Reduce exposure, become easy on the curves, use dynamic range compression if necessary.
to see histograms at the working profile stage of the pipeline. You lot might want to temporarily apply the Neutral profile to disable all the tools while checking, then revert. If your working space is not causing clipping (the default working infinite is ProPhoto and information technology's huge), then it's probable your adjustments which are causing clipping. Reduce exposure, become easy on the curves, use dynamic range compression if necessary.
Knowing how to read a histogram is a bones and very useful skill, as it can point out issues with your image regardless of how dim or miscalibrated your monitor may be.
To assistance you visualize the data, the histogram (as of RawTherapee 5.5) has three modes which scale the information in the 10 and y axes differently:
-
 Linear-linear mode. You lot find gridlines at halves, quarters, eighths and sixteenths, depending on the size of the histogram.
 -
 Linear-log mode. The x-axis is linear, the y-axis and the horizontal gridlines are scaled logarithmically. The position of the gridlines withal corresponds to the halves, quarters, etc.
 -
 Log-log mode. Both the x- and y-axes are scaled logarithmically. The gridlines are not scaled logarithmically, but correspond to stops - with every gridline the value doubles, and then there are lines for the values 1, iii, vii, 15, 31, 63, and 127 (
prisoner of war(2.0,i) - 1)).
When at that place is a disproportionately vivid area relative to the remainder of the image, it will evidence up every bit a fasten in the histogram. If yous desire to show this on a histogram with a linear y axis, the spike may push the lesser values down the y-axis, making them difficult to see. Switch to 1 of the log modes to scale the data and assist you lot go a better overview of all values.
The histogram can exist moved to the left/right panel from "Preferences > General > Layout > Histogram in left panel".
3.1.1 Raw Histograms
Raw files contain a dump of data captured by the sensor and quantified by the analog-to-digital converter. The raw file equally a container has a bit depth of its own, typically 16-fleck, while the data it contains could have a lower scrap depth - typically it is 12-scrap (0-4096) or 14-bit (0-16384). To display the data from a raw file as an image, one of the several key bits of information required to procedure the data correctly are the black and white levels. The black level is not necessarily 0, equally the sensor and camera electronics produce digital noise, so the noise floor may prevarication for instance at 512. The white level is as well not necessarily 16384; information technology depends on various things, and may lie for instance at 16300. For more than information, see the articles Demosaicing and Adding Support for New Raw Formats (particularly the header of the camconst.json file). The black and white level values used by RawTherapee are hierarchically prepare by looking in several places: in dcraw.c, inside the raw file'due south metadata, and in camconst.json (latter takes precedence). Furthermore, the user can tweak the raw black and white levels from within RawTherapee.
The raw histograms show data after black level subtraction. The correct end of the histogram is anchored on the white level. The raw histograms are affected by the detected black and white levels as well as past the black and white level adjustments made past the user in RawTherapee.
When examining the raw histogram, you may also desire to set the demosaicing method to "none". This will reveal the sensor pattern in the preview, and also cause the Navigator console to evidence the raw RGB values of the pixel currently existence hovered over. These values are affected past the detected blackness and white levels every bit well every bit by the black level adjustments made by the user in RawTherapee, but they are non affected past the white level adjustments ("white-betoken correction") made by the user in RawTherapee.
The Navigator panel shows a thumbnail of the currently opened paradigm, and RGB, HSV and Lab values of the pixel your cursor is currently hovering over.
The values shown in the primary histogram and Navigator console are either those of the working profile or of the gamma-corrected output profile, depending on the state of the gamut button ![]() located in the toolbar in a higher place the main preview. When the gamut button is enabled the working contour is used, otherwise the gamma-corrected output profile is used.
located in the toolbar in a higher place the main preview. When the gamut button is enabled the working contour is used, otherwise the gamma-corrected output profile is used.
Past clicking on the values in the Navigator y'all can cycle between these three formats:
- [0-255]
- [0-1]
- [%]
RawTherapee 5.ane onward tin testify the existent raw photosite values. To see them, ready the Navigator to employ the [0-255] range, apply the Neutral processing profile, so set the Demosaicing method to "None". The Navigator will show the real raw photosite values later on blackness level subtraction within the range of the original raw data.
3.three History
The History console contains a stack of entries which reflect each of your image editing actions. By clicking on the entries yous can pace back and along through the different stages of your piece of work.
An entry is added each fourth dimension you suit a different widget - multiple edits to the same widget are stored as one entry. For example, adjusting the exposure compensation slider from "0" to "0.iii" and so to "0.6" will issue in 1 entry being stored with a final value of "0.6". Likewise, when adjusting a curve, all individual command bespeak adjustments are grouped into one history entry. Should you wish to store the adjustments equally two (or more) history entries, you will take to separate them past adjusting some other widget. For example, bold a curve is in "Picture-like" way and you want to keep to that way: accommodate several control points on the bend, then toggle the curve style from "Film-like" to "Standard" and then dorsum to "Pic-like" to create a new history entry, and and so proceed adjusting the curve.
The history stack is not saved - it is lost as soon every bit you shut the Editor tab. None of your adjustments are lost though, as the final state of all tools is saved in the sidecar file, ready to be used the next fourth dimension you lot open that image.
3.4 Snapshots
Under the History panel is a console called Snapshots. Its use is in that y'all can salvage a snapshot of the photograph with all the adjustments upwards to that point in time, and then keep to further change your photo to requite information technology a different advent, saving new snapshots at every moment you feel you might accept reached a version of your photo worth saving. Once yous have two or more snapshots, you lot can just click on them to flip through the different versions and stick with whichever i y'all like all-time. In the future, the snapshots will be saved to the PP3 sidecar file. For now, the history and snapshots are lost when yous load a new photograph in the Image Editor or close RawTherapee.
4 The Right Panel
To the right is a panel which optionally shows the main histogram and Processing Profiles selector ("Preferences > General > Layout > Histogram in left console"), and always shows the Toolbox. You lot can hide this panel using the ![]() hide icon, or its keyboard shortcut.
hide icon, or its keyboard shortcut.
4.i Processing Contour Selector
In the summit correct corner y'all find options to apply and store specific processing profiles:

Read the folio on processing profiles for more information.
4.2 Toolbox
The Toolbox, in the right console, contains all the tools you utilise to tweak your photos. Each tool has its own RawPedia commodity.
v Editor Tab Modes
RawTherapee allows you to work on photos in 2 modes:
Try both modes and run across which one suits you best. To practice that, click on the Preferences icon ![]() in the lesser-left or top-right corner of the RT window, choose "Full general > Layout" and fix Editor Layout to your preferred choice.
in the lesser-left or top-right corner of the RT window, choose "Full general > Layout" and fix Editor Layout to your preferred choice.
Use this Preferences window to select a unlike language for the user interface, to cull a unlike color theme, change the font size, etc.
Information technology is also possible to start RawTherapee in no-File-Browser-mode (without the File Browser tab) by specifying RawTherapee to open up an image from your operating organisation'southward file browser (in other words, correct-click on a photo and select "Open up With > RawTherapee"), or by using the prototype filename as an statement when starting RawTherapee from the control line (rawtherapee /path/to/some/photo.raw). This mode was introduced for people with niggling RAM every bit non having a File Browser tab means RawTherapee uses a little less retentivity, notwithstanding in do the amount of memory saved is little and the usability cost outweighs the piddling do good, then information technology is likely to be removed in the time to come (see issue 2254).
6 The Filmstrip

RawTherapee-4.ii showing the Filmstrip with the toolbar visible, which takes up more screen space merely lets you lot easily label, rate and filter the visible thumbnails.

RawTherapee-iv.2 showing the Filmstrip with the toolbar hidden, which makes it less loftier and provides more screen space for the main preview (partially visible at the bottom).
If you employ Single Editor Tab Style ("Preferences > General > Layout") you can display a horizontal console above the preview, this is called the Filmstrip. It contains thumbnails of all images in the currently opened album, and is synchronized with the currently opened epitome so that you can use keyboard shortcuts or the previous ![]() and next
and next ![]() prototype buttons to open up the previous/adjacent prototype without needing to go back to the File Browser tab.
prototype buttons to open up the previous/adjacent prototype without needing to go back to the File Browser tab.
Equally of RawTherapee version 4.two.10, you can hide the Filmstrip's toolbar to save screen infinite. There are two ways of doing this: ane way just toggles the toolbar on/off without resizing the filmstrip to the new height, and the other way does the aforementioned just also automatically resizes the filmstrip's peak. Both are invoked via keyboard shortcuts merely. As resizing the filmstrip's pinnacle will trigger a refresh of the image preview and this might have a while if using CPU-hungry tools like noise reduction while zoomed in at 100%, the mode that doesn't resize has been implemented for users with slow machines. Users with fast machines will detect the automobile-resizing mode more helpful.
7 Monitor Contour and Soft-Proofing
The widgets under the principal preview in RawTherapee 5 allow you to apply a monitor color profile to the preview image. This enables users who take calibrated and profiled their monitors to get an instant and accurate preview of their work, whether you're staying in sRGB or working in a wide gamut. Notation: OS 10 users are limited to sRGB and will not get an authentic preview otherwise (see word), while users of Linux and Windows will go a correct wide-gamut preview.
Go to Preferences > Color Management and indicate the "Directory containing color profiles" to the folder into which you lot saved your monitor and printer ICC profile. Restart RawTherapee for the changes to take effect. Now y'all will be able to select your monitor'due south colour contour in the combo-box under the preview. Utilise the "Relative Colorimetric" rendering intent unless you accept a good reason otherwise.
One can besides enable soft-proofing of the preview. This will show you lot what your image will look similar once it gets transformed by the printer profile set in Preferences > Color Management. If you lot want to adjust an image for printing and you lot have an ICC profile for your printer-paper combination you could set that equally your output profile, enable "Black signal compensation" in Preferences so that the blackest black in your image will lucifer the blackest black your printer-paper combination is capable of reproducing, then enable soft-proofing. Yous volition come across what your epitome volition look similar if y'all impress it. This allows you to make adjustments and go an instant preview of the result, saving you lot time and ink on exam prints.
The icon with exclamation marking next to the soft-proofing button will grey out areas that cannot be reproduced by your printer, i.e. areas where you will loose details.
You lot should have a calibrated and profiled monitor in gild for the soft-proofing preview to be accurate.
The items yous meet in the monitor profile combo-box (under the main preview) and in the printer profile combobox (in Preferences > Color Management) are ICC files located in a folder which you can point RawTherapee to by going to "Preferences > Color Management > Directory containing color profiles".
Source: https://rawpedia.rawtherapee.com/Editor
Posted by: brucesiderear.blogspot.com
0 Response to "What Is A Histogram On A Camera"
Post a Comment