

How Do You Take A Video On A Canon Rebel Xti Camera?
Your Canon EOS Rebel T1i/500D offers a first-ever feature for digital SLR cameras: the ability to record digital movies. It'southward easy — and fun — to learn how to make videos with your digital photographic camera. You won't go the quality of a professional video photographic camera, but you volition have a fun mode to record memories without requiring a video editor.
Fix the Mode dial to the Movie setting.

As before long as you select Motion-picture show mode, you can preview your shot on the monitor. You also meet various bits of recording data on the screen; remember, you tin press the DISP button to cycle through the different data display modes if you lot desire more or less screen clutter.
Utilise the Card push to display the Flick menu and and so select the desired movie quality setting under Motion-picture show Rec. Size.
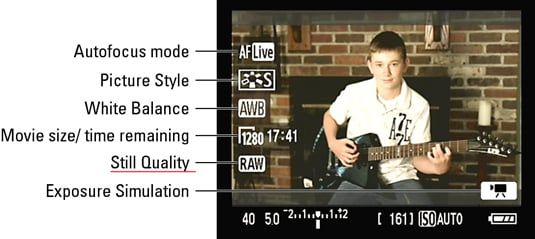
Y'all can tape movies at three different quality levels. The setting you lot choose determines the frame size and aspect ratio of the movie: 1920 x 1080, known as Full Loftier-Definition; 1280 x 720, which qualifies equally plain ol' High Def; and 640 x 480, which gives you standard definition. The ii higher-quality settings produce movies that have a 16:0 aspect ratio, which is found on many new Goggle box sets and computer monitors. The 640 10 480 setting delivers a 4:3 format, which fits old monitors and standard TVs. The Quality setting also determines the frame charge per unit: 20 frames per second (fps) for Full High-Definition, and the more typical and slightly less choppy thirty fps for the other two.
The college the Quality setting, the larger the size of the file needed to shop the movie. At the highest setting, you can fit about 12 minutes of movie on a 4GB memory menu; driblet the setting to 640 x 480, and y'all tin double the length of the movie. No matter what Quality setting is selected, the maximum size for all movie files is 4GB.
While in the Movie menu, alter other movie preferences as needed.

Through the Motion-picture show menu, shown here, y'all can alter five settings in improver to moving picture quality (Movie Rec. Size): grid brandish, metering timer, AF mode, sound recording, and remote control.
Grid brandish allows you to display 2 different styles of grids to aid go on your shots aligned properly. Choose Filigree one for a loosely spaced grid; choose Filigree ii for a more tightly spaced filigree. For no grid, leave the choice set to the default, Off.
Metering timer allows yous to request a shorter or longer delay in the meter readings for autoexposure settings. (The default is to establish settings when you printing the shutter button halfway, so let the meter sleep for xvi seconds to save battery power.)
AF style offers three autofocus methods.( Manual focus ordinarily provides better results.)
Sound recording determines whether you lot record audio or shoot a silent film
Remote command allows yous to outset and finish recording via the optional remote control unit. (For the RC-1 remote unit, after you lot select On, y'all also must set the timing switch to the 2-second filibuster to apply information technology for moving-picture show recording.)
Compose your shot and gear up the focus.
If yous are using transmission focus (which is recommended), set the lens switch to MF and twist the focusing band on the lens to bring your subject area into focus.
Apply Exposure Compensation if desired.
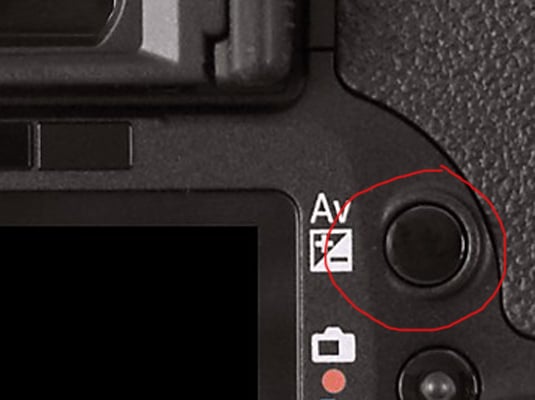
You don't actually have much command over exposure during moving picture recording; the photographic camera automatically sets all exposure options for you. However, you can tell the camera that y'all think that information technology'south over- or underexposing your film and asking that your adjacent recording be a little darker or lighter.
To apply this exposure shift, set up the display to one of the two modes that reveals the exposure meter at the bottom of the screen. (Printing DISP to change the display style.) And so press and concord the Exposure Compensation push, shown here. Rotate the punch to move the bar nether the meter to the right for a brighter picture show; move the indicator left for a darker picture. Release the Exposure Compensation push button when you stop.
Press the Alive View button to start recording.
When yous press the Alive View button, highlighted here, a scarlet "recording" symbol appears on the monitor.
Press the Lv button to finish recording.
Your movie is gear up to preview, download, and distribute to your doting fans.
About This Article
This article can be found in the category:
- Canon ,
Source: https://www.dummies.com/article/home-auto-hobbies/photography/cameras/canon/how-to-record-video-with-a-canon-eos-rebel-t1i500d-206253/
Posted by: brucesiderear.blogspot.com
0 Response to "How Do You Take A Video On A Canon Rebel Xti Camera?"
Post a Comment